Meal prep is all the rage these days. And for good reason. Nothing makes your eating choices easier than having healthy options already prepared at the moments when time is not available. I couldn’t tell you how many times I chose to eat out only based on the fact that I didn’t have enough time or energy to make something, and I am sure I am not alone.
Now that I have a little one, time is an even more important currency to me than anything else. My toddler needs me more than I like it sometimes and that is okay. However, I cannot forget that to stay healthy, I need to eat healthy and so does my family.
You will love these simple suggestions because they can make meal prepping less intimidating than it may seem at times.
7 THINGS I MEAL PREP EACH WEEK
- Boil eggs. Nothing can be easier (well, the boiling part is easy – the peeling might be different story). Put your eggs in a pot, cover with water, boil it up, turn it off set a timer for 7-8 minutes, then put into an ice bath. Easy peezy!
- Cut up veggies. Romaine, carrots, celery, peppers, cabbage, onions – whatever vegetables you like – cut them up. Put them into glass containers and store in the fridge. This makes making salads and stir fries a breeze!
- Make a protein salad. Since you just cut up some onions and celery – why not toss some of that in a bowl, along with some seeds and maybe even some raisins, then pop in a few cans of tuna or wild salmon, some of your favorite spices – add some mayo and mix it up. You have yourself a few servings of an easy protein salad that you can grab and eat.
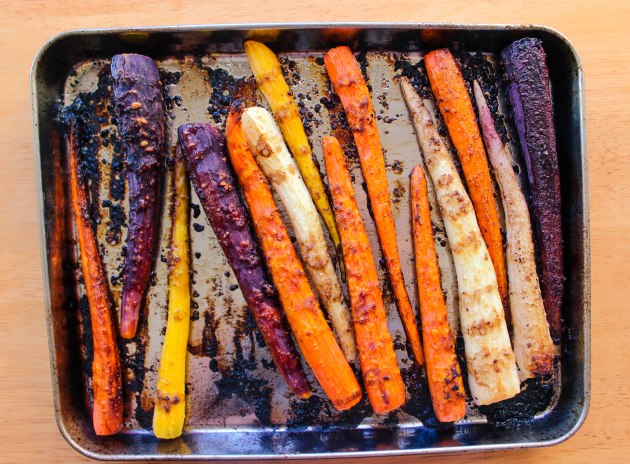
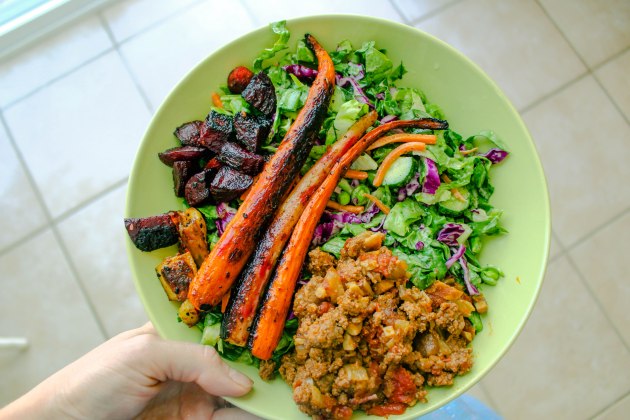
- Roast veggies. I love making bowls – and they come together super easy with roasted vegetables. My favorites are the Trader Joe’s trip colored carrots roasted in balsamic vinegar and avocado oil with garlic & herbs. I also cut up some beets and regular carrots as well as sweet potato veggies. I usually roast two smaller baking sheets at a time, so I can save some time.
- Bake a chicken. I love making a spatchcock chicken. I can toss it in the oven right after I roast my veggies and leave it to bake for an hour. I love buttering mine up with grass fed butter, salt & pepper along with dill! For a great way to make one check out Nom Nom Paleo’s blog here . I then cut it up and serve it with veggies, on salad or shred some of it for a quick protein salad. I ALWAYS save the bones and freeze for the following weeks meal prep(I’ll get to the reason why next)!
- Make bone broth. I know this can seem a bit more time consuming than time saving, but hear me out here. You will have a ton of veggie scraps from the veggies you make – and you will also have bones from the chicken you baked the week before. Grab those bones and those veggies and place into your Instant Pot (if you’re new to the IP game, you can find one here ) or you can always make it right on the stove. I place my scraps and bones into the IP, cover with water, add a tbsp of apple cider vinegar, seal and set on manual for 160 minutes. Once done, let cool, strain and refrigerate. Such an easy way to make sure all of your food is used up and a great way to add vitamins, minerals and protein to your diet!
- Make an egg bake. If you still have some time, you can also make a quick and easy egg bake. The basics are this – veggies and eggs. You can always put another source of protein in there – like sausage or cut up bacon if you would like. I will be sharing my favorite egg bake with you guys soon. Toss everything together, place into a greased baking sheet and bake at 375 for 45 minutes. Don’ forget to eat this with a healthy fat, like an avocado when you heat it up during the week.
These are my go-to meal prep steps I take weekly. They free up a ton of my time during the week, and most of the work is only hands on during the prep.
What steps do you take to make your meals easier during the week?
Disclosure: This post may contain affiliate links, which means I may receive a commission if you click on the link and make a purchase I have recommended. While clicking the link will not cost you extra money, it will help me keep this site up and running.

